You can do a lot of things with Google Maps right? In this short tutorial, we will create a Google Maps component with Nuxt3. We will also add tailwind and tailwind elements to our projects.
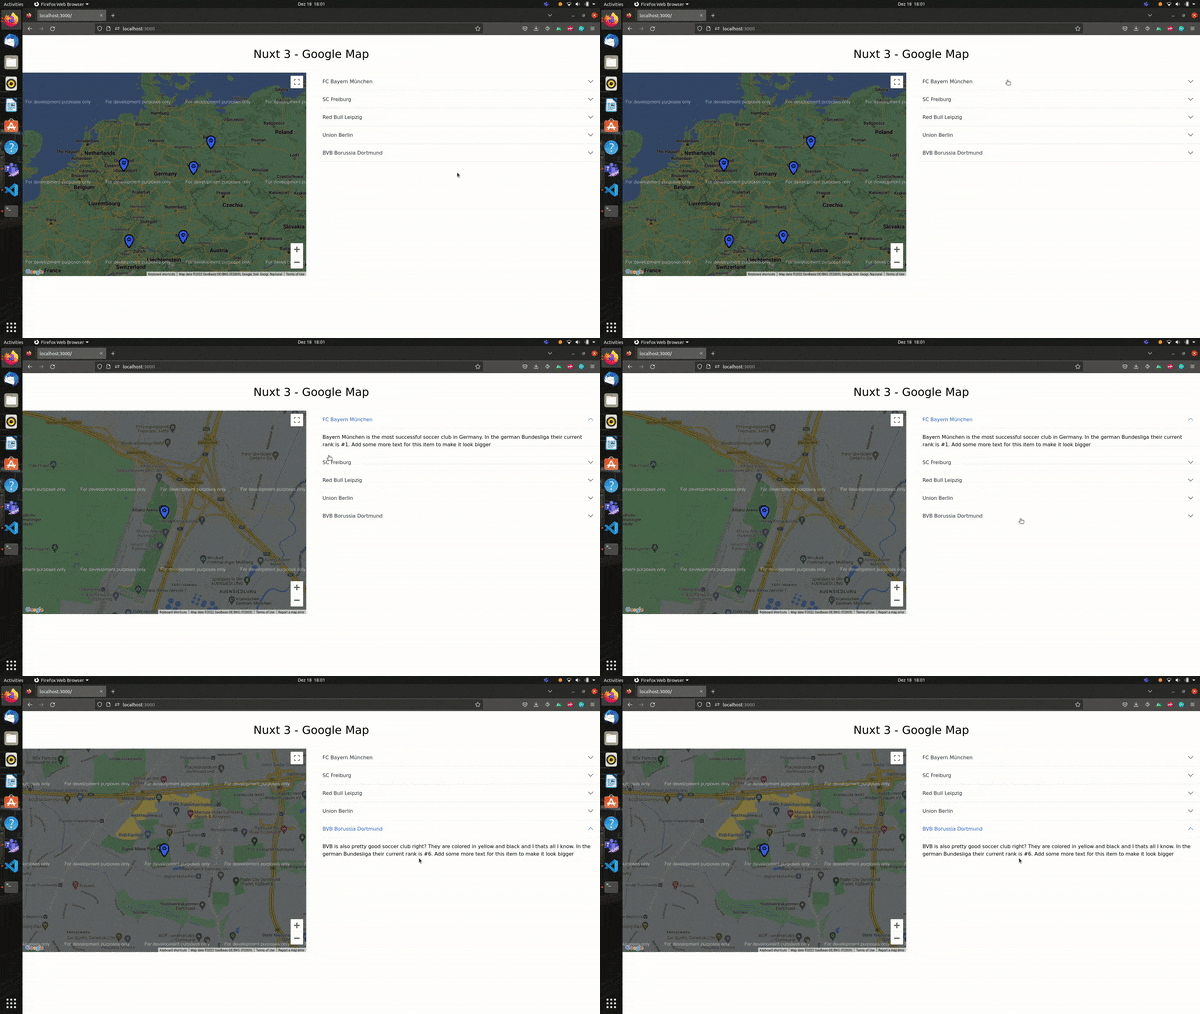
In the end, we want to have a component that looks like this:

Adding tailwind and tailwind elements
Tailwind.css is a pretty popular and great CSS framework. That's why we are going to use it in this project. We also want to have some components built with tailwind so we don't have to create them on our own. That's why we use tailwind elements.
Adding tailwind
Once you created your Nuxt 3 project you can add the Nuxt tailwind module dependency to it. It's very easy and fast to do that. We are using ǹpm and just run:
npm install --save-dev @nuxtjs/tailwindcss
After that, we only need to add the module to our nuxt.config.ts
export default defineNuxtConfig({
    modules: ['@nuxtjs/tailwindcss']
})
That's it now we are ready to use tailwind in our project. We only need to add the classes to our components.
Adding tailwind elements
Tailwind elements will give us a bunch of components. We are going to use the accordion component for the Google Maps we are building. Let's install it with:
npm install tw-elements
After installing tailwind elements we also need to adjust our tailwind.config.js :
const plugin = require('tailwindcss/plugin');

module.exports = {
    content: [
        './src/**/*.{html,js}',
        './node_modules/tw-elements/dist/js/**/*.js'
    ],
    plugins: [
      require('tw-elements/dist/plugin')
    ]
};
Now we have our tailwind dependencies installed. Let's install Google Maps next.
Google Maps
We are using Vue 3 Google Map. This works with Nuxt 3 and works pretty well. Install it with:
npm i vue3-google-map
We are all set up now and can use Google Maps already. Let's create our Nuxt 3 Google Map component that reacts on an accordion.
Nuxt 3 Components
For the final result we need 3 components:
Accordion
MarkerList / MarkerCluster
Google Map
In our accordion, we put information from popular soccer clubs from the 1. Bundesliga. I don't know anything about soccer so there will just be some random text.
Our MarkerList will handle the locations on Google Maps. We want to add custom markers to the locations of the clubs' stadiums.
And in our Map, we put the components together and render a Google Map.
Tailwind Elements - Accordion
Since we are using tailwind elements we simply can use the Accordion Component from there.
<script setup>
import 'tw-elements';

const props = defineProps({
    marker: {
        type: Object,
        required: true,
    }
});

</script>
<template>
    <div class="accordion-item border-t-0 border-l-0 border-r-0 rounded-none bg-white border border-gray-200">
        <h2 class="accordion-header mb-0" :id="'heading-' + marker.id">
            <button class="
                    accordion-button
                    collapsed
                    relative
                    flex
                    items-center
                    w-full
                    py-4
                    px-5
                    text-base text-gray-800 text-left
                    bg-white
                    border-0
                    rounded-none
                    transition
                    focus:outline-none" type="button" data-bs-toggle="collapse" :data-bs-target="'#' + marker.id"
                aria-expanded="true" :aria-controls="marker.id">
                {{ marker.headline }}
            </button>
        </h2>
        <div :id="marker.id" class="accordion-collapse border-0 collapse" :aria-labelledby="'heading-' + marker.id"
            data-bs-parent="#accordionFlushExample">
            <div class="accordion-body py-4 px-5">
                {{ marker.text }}
            </div>
        </div>
    </div>
</template>
We define a prop here called marker. This prop is being used to get data into the accordion headline and the text under the headline. Let's create the MarkerList Component next.
MarkerList Component
In our Map, we wanna use a custom Marker. There are a couple of SVG Libraries to get good icons from. I'm going to use the location icon from ionic icons.
We create a public/img directory where we place our icons.
Our MarkerList component then looks like this:
<script setup>
import { CustomMarker } from 'vue3-google-map';

const props = defineProps({
    marker: {
        type: Object,
        required: true,
    }
});

</script>

<template>
    <CustomMarker
        :options="{ position: { lat: marker.lat, lng:  marker.lng }, anchorPoint: 'CENTER' }">
        <img src="/img/marker.svg" width="50" height="50" />
    </CustomMarker>
</template>
We wanna get the position from the prop here as well. So we defined a marker prop.
Google Map
In our maps component, we now make use of our accordion and our MarkerList. Creating a Google Map works out of the box after installing Vue 3 - Google Map.
You need your Google Maps API Key to make the map work at all.
Our component could look like this:
<script setup>
import { GoogleMap, MarkerCluster } from 'vue3-google-map';
const locations = ref({
    FCB: {
        id: 'FCB',
        headline: 'FC Bayern München',
        text: 'Bayern München is the most successful soccer club in Germany. In the german Bundesliga their current rank is #1. Add some more text for this item to make it look bigger',
        lat: 48.21888549557031,
        lng: 11.625109549171704
    },
    SCF: {
        id: 'SCF',
        headline: 'SC Freiburg',
        text: 'SC Freiburg is also a german soccer club from the 1. Bundesliga in Germany. In the german Bundesliga their current rank is #2. Add some more text for this item to make it look bigger',
        lat: 48.021196964093434,
        lng: 7.82996300258625
    },
    RBL: {
        id: 'RBL',
        headline: 'Red Bull Leipzig',
        text: 'Red Bull Leipzig is a very good soccer club as well. They are sponsered by Red Bull I guess. In the german Bundesliga their current rank is #3. Add some more text for this item to make it look bigger',
        lat: 51.34762220651972,
        lng: 12.35519705573161
    },
    FCUB: {
        id: 'FCUB',
        headline: 'Union Berlin',
        text: 'This is a soccer club from Berlin. I dont know anything about soccer but here is more text. In the german Bundesliga their current rank is #5. Add some more text for this item to make it look bigger',
        lat: 52.45755304910101,
        lng: 13.568600380052235
    },
    BVB: {
        id: 'BVB',
        headline: 'BVB Borussia Dortmund',
        text: 'BVB is also pretty good soccer club right? They are colored in yellow and black and I thats all I know. In the german Bundesliga their current rank is #6. Add some more text for this item to make it look bigger',
        lat: 51.492787217050754,
        lng: 7.452501674962833
    }
});
const zoom = ref(6);
const center = ref({ lat: 51.075857938487424, lng: 10.313596029890055 })
function zoomEvent(item) {
    center.value = { lat: item.lat, lng: item.lng };
    zoom.value = 15;
}
</script>
<template>
    <ClientOnly>
        <h2 class="text-4xl text-center container mx-auto p-10"> Nuxt 3 - Google Map</h2>
        <div class="w-full grid grid-cols-1 lg:grid-cols-2 gap-8">
            <GoogleMap api-key="YOUR API KEY HERE" class="map" :center="center" :zoom="zoom">
                <MarkerCluster :options="{ position: center }">
                    <div v-for="marker in locations">
                        <MarkerList :marker="marker" />
                    </div>
                </MarkerCluster>
            </GoogleMap>
            <div class="accordion accordion-flush" id="accordionFlushExample">
                <div v-for="marker in locations">
                    <div @click="zoomEvent(marker)">
                        <Accordion :marker="marker" />
                    </div>
                </div>
            </div>
        </div>
    </ClientOnly>
</template>

<style scoped>
.map {
    position: relative;
    width: 100%;
    height: 650px;
}
</style>
We need to import the Google Map components to make it work. Also, we need to give the map a height. Then we create a location object with all data that we need.
In our locations ref there are a couple of soccer clubs. That's very static but this would also work if you would get the data from a WordPress or Typo3 or any Backend.
In the Google Map component, we have the two props zoom and center. That are also the props we need to zoom to one specific location.
Adding the MarkerCluster
In our locations ref we have multiple locations and we want to display them on a map. That's possible with the MarkerCluster component which also comes from the Vue 3 - Google Map.
All we need to do is to loop through the locations and add our MarkerList the component into the MarkerCluster. So a better name for the MarkerList probably would be CustomMarker. Here is the code again:
 <MarkerCluster :options="{ position: center }">
    <div v-for="marker in locations">
        <MarkerList :marker="marker" />
    </div>
</MarkerCluster>
Adding the Accordion
Also, let's take a look at the Accordion part real quick. The Accordion component needs a parent wrapper so we have to put a <div> around it before we render it.
<div class="accordion accordion-flush" id="accordionFlushExample">
    <div v-for="marker in locations">
        <div @click="zoomEvent(marker)">
            <Accordion :marker="marker" />
        </div>
    </div>
</div>
Here we also need the function to zoom to the selected marker.
We already have two properties that we need to change on a click event. We do that by overriding the value like this:
function zoomEvent(item) {
    center.value = { lat: item.lat, lng: item.lng };
    zoom.value = 15;
}
That's it! You also could improve it by zooming back if you close an element from the collapse but we have created what we wanted to.
Conclusion
We created a custom Google Map component with custom Markers. On our map, there are multiple markers and we zoom into the markers on a click event. I think that's pretty cool right?
If you have a store in multiple locations this could be very useful. Or for a sports website with multiple important locations. Make sure to use your Google Maps API Key to make it work.
You can take a look at the code on my GitHub. Thanks a lot for reading!
